
You'll have to wait until Tuesday to see the image made up into a card, and I hope you like what I've done. This tutorial has also been published on this week's Passion for Promarkers Weekend Workshop. Along with a wee tease of the prize for the upcoming prize blog hop.
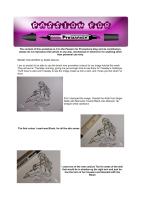
 First I stamped the image, Claudia the Artist from Sugar Nellie with Memento Tuxedo Black onto Stampin' Up whisper white cardstock
 The first colour I used was Blush, for all the skin areas
 I used on of the new colours Tan for areas of the skin that would be in shadow eg the right arm and just below the hem of her trousers and blended with the Blush
 I then coloured her trousers with another of the new colours, Mulberry, using a small circular motion
 I then added Plum to the areas of her trousers that would be in shadow and blended with the Mulberry.


 For her top I used Orchid, again colouring it with small circular movements
 I have added Purple to the areas that would be darkest, then blended
 Moving onto her belt/scarf, I used Pink Carnation to colour the whole area. I then used Fuchsia Pink for the shadows and blended again with the Pink Carnation (2 pics below)

 Moving onto her hair I used yet another of the new colours, Caramel. I coloured the areas that I wanted highlighted, where I imagined the light would hit.
 The second colour I used for the rest of her hair was Walnut.
 I blended this very lightly with the Caramel, I left the effect quite rough, to make it look like it has more texture.
 The I added Umber to the areas that wouldn't get any of the light e.g. the underneath of the hair on her right, the roots and ends.
 Again I blended this with the Caramel, roughly for more texture.
 For her accessories, bracelets, earrings etc I used Cerise. Then added Magenta from the old colours for the areas in shadow (pic below)
Finally, this is the finished image, you will see how I've made it into a card on Tuesday morning for my challenge week where you can use any colour of promarker.


10 comments:
fab tutorial, thanks so much
Victoria
x
You make it sound so easy but these tutorials are so helpful. I keep practicing with my blending. These new colours look lush and I definitely need some. Marianne x
Another great tutorial, I have enjoyed each and every one of them. They have been so useful to me. I love the look of those new colours and I am not jealous much that you got yours before us lol.
Kim xXx
Hi Debs, I love your tutorials, they are so concise and so much work goes into them, thank you for that! Hugs Dawn Marie.xx
Thanks Debbi, your tutorials are really helpful :)
Anne
x
a brilliant tutorial hun.. thanks for sharing. hugs Rachxx
Fab Tutorial Debbi, Thanks for sharing. Kim
This is the simplest explanation i have found so far, and your pics are fab!!! i aspire to make mine look so good!! Keep up the good work x
Beautifuly explained tutorial. Love the color combination and image coloring. Keep up the good work. Keep blogging. ThaNKS.
Thanks fo the fab demo I love the way you make it look so easy :) now all i have to do is go and make my image look as fab as yours maybe one day i'll have to keep practicing luv mandy xx
Post a Comment