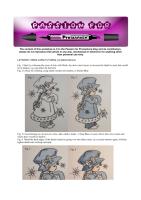
Fig. 1 Start by colouring the areas of skin with Blush, lay down more layers to increase the depth in areas that would be in shadow e.g. just under the hat brim
Fig. 2 Colour the clothing, using small circular movements, in Denim Blue
Fig. 3 Concentrating on one area at a time, add a darker shade—China Blue, in areas where there are creases and where there would be shadow
Fig. 4 Blend the hard edges of the darker shade by going over the darker areas, in a circular motion again, with the lighter shade and working outwards
Fig. 5 Shows the same technique applied over the whole image
Fig. 6 Colour the accent/trim areas with Fuchsia, laying down more layers of colour over areas that would be in shadow.
Finish the image by colouring the hair with Caramel, Cocoa and Umber.
Trim the image to the required size, and layer it onto a contrasting cardstock, trimming the edges to leave a narrow border around the image. Add glitter and/or adhesive gems to the image.
Cover a card blank with patterned paper, then take a co-ordinating scrap piece of patterned paper and layer it onto the same contrasting cardstock as before.
Take a piece of white satin ribbon, and using the broad nib, colour the ribbon with Fuchsia. Then wrap the ribbon around the matted paper panel.
Adhere the matted paper panel at an angle to the covered card blank, then, using 3D foam tape adhere the image to the card front.
Add embellishments, the card below has 3 snowflakes punched from the co-ordinating cardstock which have been embellished with snowflake sequins and glitter dots.
Finally add a greeting. (Fig. 7)
Supply List:
Image is Snowflake from Sugar Nellie
Promarkers: Blush, Cocoa, Caramel, Umber, Fuchsia, Denim Blue & China Blue
Papers: Daisy & Dandelion Xmas Pad (also the greeting)
Cardstock: Core'dinations
Papermania Glimmer Dots
Snowflake sequins from Kars
Anita's white satin ribbon
Martha Stewart snowflake punch
Glamour Dust
The Craft Gift Pack contains 12 specially selected ProMarkers, 1 ProMarker Blender pen, 1 Fineliner pen, 1 Storage Wallet and 1 Bleedproof Marker Pad.
To download this tutorial, click this icon


8 comments:
Your colouring is stunning, love the finished card, it's gorgeous. Thank you so much for sharing the tutorial online xxx
You can't see Debbi, but I'm giving you a round of applause for this superb & professional tutorial - fantastic!!
Have a great weekend hun
Love Steph xxx
Fab colouring tip (and beautiful card) xx
Just gorgeous thanks Debbi
Ann xxx
Ohhh wowwww Debbie,what beautiful,i love the image and colours.
So gorgeous papers.
Hugs Riet.x
This is amazing Debbi, you make it seem so easy -0 all I need are some Promarkers now - hint hint!!!
Hugs Ali x
Very nice tutorial Debbi, thank you for sharing :) your coloring is amazing!
Hugs
Hazel
OMG Debbi... this tut is just sooo helpful. I am gonna have to play today I think xx Clare x
Post a Comment